As the world continues to shift towards alternative energy sources, solar power will only continue to grow. Technologies will come and go and the astute product providers will continue to innovate.
Contributed by | DCE Solar
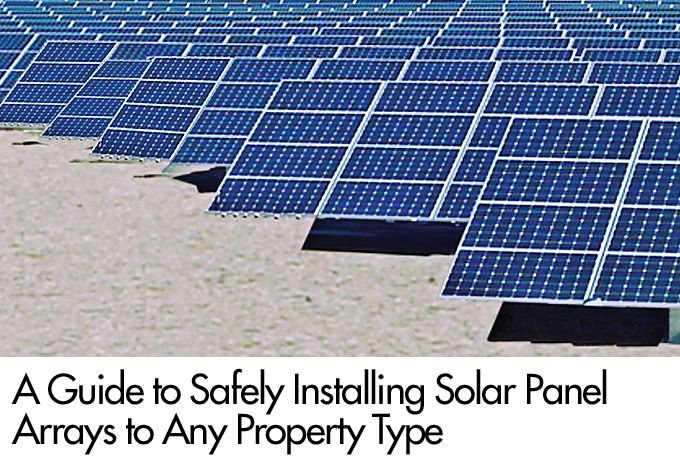
Maximizing the Clean Energy Investment
As the market for solar energy continues to grow, so does the demand for effective, cost-efficient installations that can begin delivering return on investment. At the same time, the new surge in the market has seen many manufacturers enter the clean energy sector with an aim to drive down costs with less expensive equipment.
While this may seem like a value or competitive advantage at first, many industry experts, professional installers, and large contractors are discovering that quality is still king when it comes to solar installation jobs that satisfy clients and generate profitability.
Various consumer studies* have shown that solar panels typically “pay for themselves” within 5 to 15 years, and in as little as 2 to 4 years in states offering strong incentives for installing clean energy systems. There are even locales throughout the U.S. and Canada that will pay property owners that tie their systems into the existing energy grid in energy usage credits for surplus energy supplied to the greater power network. With all this in mind, it’s not surprising that many people are taking a closer look at solar power and how to safely and effectively add it to their properties. While technologies have advanced to the point that solar panels are much more efficient and less cumbersome than in decades past, proper installation remains one of the most important factors in maximizing and protecting your investment in clean energy.

Anatomy of a Solar Array
Modern ground-mounted solar arrays are made up of two main components:
SUPERSTRUCTURE - the “top” of the array with a rack system that holds all panels in a framed arrangement
SUBSTRUCTURE - the “bottom” of the array which provides all structural and standing support. This includes any subterranean anchors and tethers necessary to stabilize and secure the array.
While the superstructure is what will do all the “work” once installed, it is actually the substructure that is the key to the longterm performance and safety of the array. Of particular importance is the method by which the substructure and superstructure are supported. Generally, there are four major methods by which an array can be supported. Each is made to address different installation scenarios and each has its own advantages and disadvantages.
DRIVEN BEAMS - in strong, predictable soil conditions, support beams are driven into the ground to a specified depth. Substructure is then fastened accordingly.
Pros: inexpensive, quick, simpler construction
Cons: unpredictable subterranean conditions can cause refusals of driven beams, jobs may require multiple beams and additional labor costs, and quality of beams being used drastically impacts performance
Special considerations: higher-strength beams may present a higher materials cost, but often require fewer beams and lower labor and installation costs as well as increased performance over time. Notched beams can eliminate brackets, but may also cause buckling during the driving process – resulting in additional time and material costs
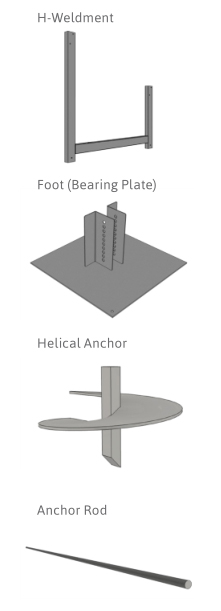
ANCHOR SYSTEM - for soil types not well suited to driven beams, anchored systems offer strength and support. For many less-than-ideal soils, anchored systems may be the only viable solution.
Pros: widely adaptable to numerous different soil types, suitable for use with variable conditions within a single site (such as one that contains rock and/ or spots with poor soil), multiple different anchor types available, field-tested anchors ensure capacity of the foundation and guarantee system integrity
Cons: can be more expensive than driven beam, limited to slopes of 10% grade or less,
Special Considerations: Not all racking systems are designed to work with both driven beam and/or anchors. If purchasing a system before completing a site survey, modular/versatile systems are recommended.
BALLAST: typically reserved for commercial installations of multiple arrays, ballasts provide a solid man-made concrete footing for the substructure.
Pros: completely controllable, can be created from poured concrete or precast concrete pavers
Cons: Very expensive, not typically suitable for smaller installations because of cost, requires more components in addition to concrete and concrete forms, some soils cannot accommodate heavy equipment such as concrete trucks or cranes.
Special Considerations: Precast pavers are less expensive, can save on labor costs, and are a quicker installation method
HYBRID: in some properties, a mix of support methods is necessary. Sometimes this is due to actual conditions in the terrain, other times it has to do with the preferences of the property owner or the specifications of the solar array substructure and superstructure.
Special Considerations: Versatile racking systems are an absolute must when dealing with multiple support methods, variable site conditions, or unknown soil issues.
Laying the Groundwork
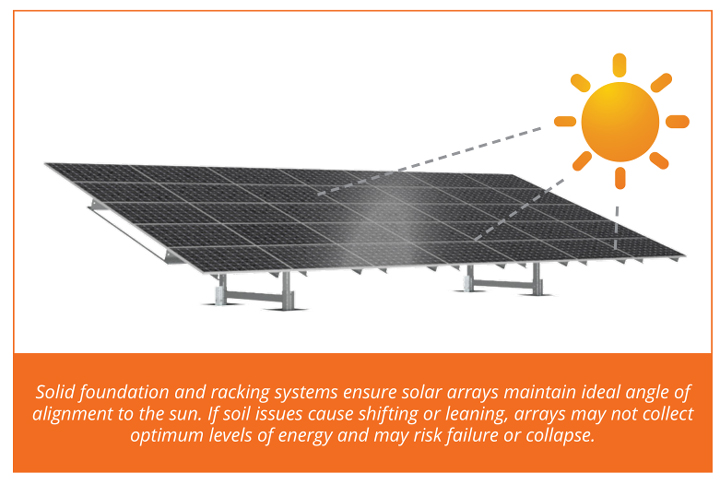
The saying goes, “always start from a strong foundation...” and for solar panels it is especially important. Under ideal conditions, solar panels are generally guaranteed to produce at least 80% of their peak output for 20 to 25 years, with no more than a 1% decrease in efficiency per year. That is outstanding performance compared with many other energy sources. Ensuring that performance, however, requires proper installation and maintenance of the solar array. While the panels themselves are marvelous pieces of technology, they’re only as good as the frame that holds them in proper alignment to the sun. Think of it like high-speed internet - you can have the fastest data connection in the world, but if you’re using a 1980s-era desktop with a dial-up modem, your clients are not getting the most out of their systems.
Challenge #1 - Soil Types
Where a property is located has a significant impact on successfully installing a solar array. The main support beams of the rack system require suitable depth and stability in order to perform as expected.
Just like any other structure you’d build on a property, you want to make certain you’re starting with a solid base.
The challenge is that no one can see exactly what’s under the ground in any given spot. In one area, there may be a rock formation just beneath the surface. A few feet away, there may be tree roots. In yet another area, the soil may be prone to moisture. And all those conditions can change the deeper into the soil you go. Assuming all the soil is the same in a designated location is a quick recipe for rising job costs and eroding profitability.
Fortunately, it’s a relatively easy problem to solve. Nearly every type of soil or ground condition has a way to work around it, as long as you know what you’re up against. Performing a thorough site survey exploration from a qualified geotechnical firm is one of the smartest and most effective ways to evaluate the selected location for your installation and/or select the best-possible spot on the property prior to installation. Though it does add a small up-front expense for the project, it offers excellent savings in terms of long-term maintenance and performance.
Likewise, the racking system you choose should allow you to address multiple scenarios without requiring custom-built racks or foundation solutions. The key is adaptability. Modular systems that feature different connections between support beams and ground anchors can help ensure that you’ve got precisely what you need to install virtually any solar array - no matter what conditions exist on your job.
Going Deeper: A Closer Look at Soil Types
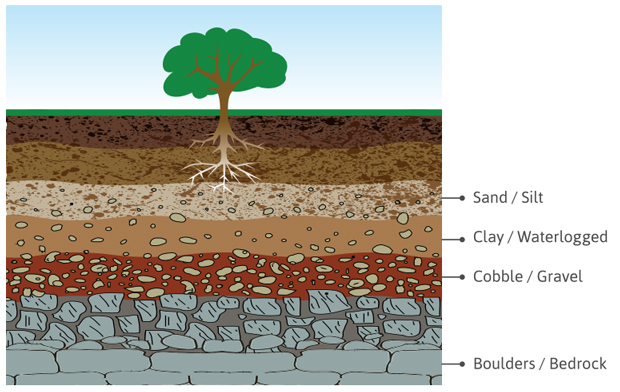
BOULDERS / BEDROCK
- Characterized by large masses of completely solid rock
- May require excavation or alternate site location
- Can damage equipment if hidden or unknown
- Driving beams is often difficult or impossible
- Beam refusals present tremendous costs and delays that threaten project viability
- Requires rock anchors and/or Micropiles
COBBLE / GRAVEL
- Characterized by numerous small rocks and pebbles may be loose with a lot of “give” or dense and compacted
- Settling conditions can be a concern
- Can present challenges for driving beams
- Requires screw anchors or micropiles
SAND / SILT
- Characterized by tiny granular composition making up 60% or more of total composition
- May be tightly packed and dense or very loose and “shifting”
- May require excessive beam lengths and specialized installation equipment
- Driven beams sometimes may not achieve necessary capacity
- Settlement is a major concern
- Requires screw anchors and/or Micropiles
CLAY / WATERLOGGED
- Characterized by generally moist subsurface texture
- May be easily compactable or very hard and dense
- Density may vary widely within a single area
- Driving beams sometimes may not achieve necessary capacity
- Requires screw anchors and/or Micropiles
Challenge #2 - Drainage
Once you’ve accounted for different soil types and their unique needs, it becomes important to consider other variables that will affect the solar array, most notably water and drainage.
All soil types are susceptible to change with the presence of water. It can make clay, sand, and silty soils softer. It can wash away or erode gravelly rocky soils. And it can even crack bedrock through repeated hard, deep freezing. Sometimes, the makeup of the soil itself can cause changes over time.
Extremely acidic or alkaline soils, for example may “digest” organic matter like compacted leaves, roots, etc. leaving space for holes or shifting. Soils with very high or very low ph may also deteriorate the support beams and anchors over time, weakening their structural performance. These situations and others like them present real problems for structures placed on top of changing soils.
There are two ways to mitigate such issues - and both happen well before any installation takes place. First, if soil samples are taken as part of the site selection process, soils can be analyzed for pH. A racking system with proper design and the right amount of protective coatings (such as hot-dip galvanization) can then be selected for protecting structural members from corrosive conditions. Secondly, if a geotechnical survey is done prior to installation, the site can be properly prepped to address any drainage or other issues that may be present. Grading or compacting ground is one common remedy, as are drainage channels or ditches, depending on the specific characteristics of the site and size of the planned solar array.
As with many things in life - an ounce of prevention is worth a pound of cure.
Challenge #3 - Maintenance
With proper, professional installation, solar arrays often require little to no maintenance. It’s one of the major benefits of solar energy as opposed to wind or hydroelectric turbines. However some regular maintenance should be expected early on in the life of the array to ensure peak performance.
SUPERSTRUCTURE MAINTENANCE
Once or twice a year be sure to inspect the panels and frame for stability, strength, and signs of excessive wear. Loose panels may indicate frame needs to be tightened (this is common in places where temperatures vary greatly over the course of the year). Rust or physical damage should be remediated or replaced as necessary. Any debris or dirt that may be obscuring the panels should be cleared to ensure maximum capture of solar energy.
SUBSTRUCTURE MAINTENANCE
Once or twice a year, check your substructure for signs of settling. This is very common in the first 1 to 2 years of an installation as sites return to normal after construction. Nuts and fasteners should be tightened as necessary according to manufacturer specifications, and anchoring systems should be evaluated for strength. Conditions such as ponding or standing water, soil erosion, or damage to the substructure should be remedied as soon as possible to prevent further damage or failure.
Remember! - Starting with a high-quality system constructed of superior materials can greatly reduce maintenance costs over time.
Cost vs Quality - What’s More Important?

No one would specialize in solar energy installation and contracting if it required extremely expensive equipment in order to be effective. At the same time, sub-standard equipment doesn’t deliver the full benefits of solar energy and can actually cost your business money in terms of labor costs, replacement materials for failed components, and maintenance contracts that are expensive for both the property owner and the installation and maintenance provider. Like many things in business, it’s a balancing act. As with most technologies, solar energy is an example of “you get what you pay for.” As far as quality goes, there are some minimum standards to keep in mind for safe installation and usage. Some benchmarks include:
ASCE -7 - this is the minimum design standard for wind and seismic activity. Any equipment not meeting this standard should be used with extreme caution.
INTERNATIONAL BUILDING CODE - installation should be compliant with international and local building codes to ensure maximum safety on your job and neighboring properties.
MATERIALS - since arrays are exposed to a variety of outdoor conditions, the type of material, weight, thickness, and any coatings are all relevant considerations.
Stainless steel and G115 galvanization will outperform unfinished steel and lower galvanizations like G90.
LONGEVITY - when purchasing an array and rack system, ask what the designed lifespan is. Ideally, it should be 30 years or more so that you may replace or upgrade panels without having to redo rack installation every time.
Making Clean Energy Work for You
As the world continues to shift towards alternative energy sources, solar power will only continue to grow. Technologies will come and go and the astute product providers will continue to innovate. Vetting and choosing experienced professionals and reliable resources are among the best ways to ensure you’re making smart, informed decisions making your solar plant safe and reliable.
DCE Solar is proud to have been a part of the clean energy movement since 2008 and is committed to expanding the availability and use of clean energy to homes, businesses, and properties throughout the country.
DCE Solar
To learn more about our products and services designed for Solar Energy, or for more information about our other clean energy resources and initiatives, please visit us online at DCEsolar.com or call us at 704-659-7474.
The content & opinions in this article are the author’s and do not necessarily represent the views of AltEnergyMag
Comments (0)
This post does not have any comments. Be the first to leave a comment below.
Featured Product